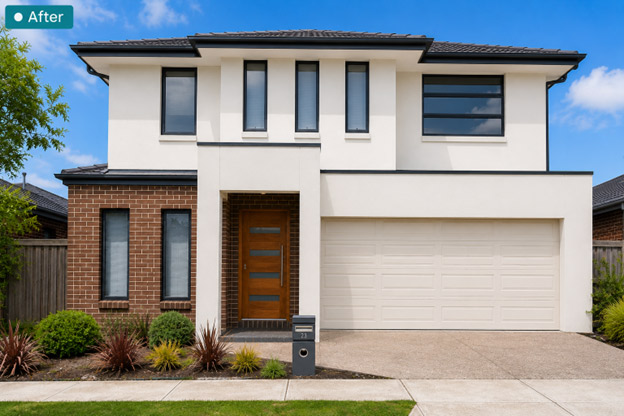
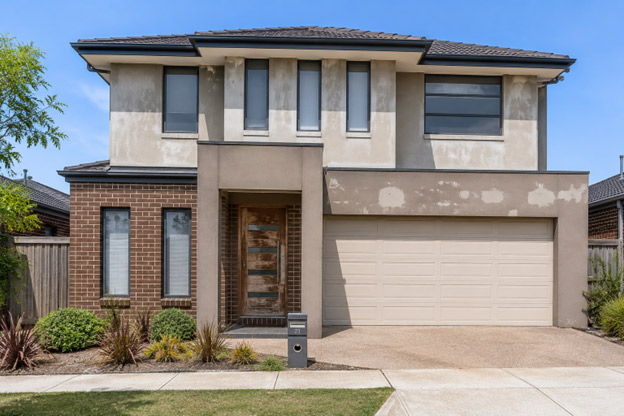

Scott and his partner had lived in their Grand Lakes home for eleven years. They weren’t moving because they wanted to – the house had served them well. But when they decided to sell, their agent’s first comment was direct: the exterior needed work before any photos were taken. This is what we found, what we did, and what happened at the first buyer inspection.
Scott
Grand Lakes Estate, Lara VIC
Double-storey brick veneer, rendered feature walls, ~12 years old
Full exterior repaint - pre-sale
7 working days
Dulux Weathershield + Dulux Primer Sealer
2025
Sold at first inspection week
Lara’s position west of Geelong exposes homes in estates like Grand Lakes and Lovely Banks to sustained UV radiation on north and west elevations, combined with the westerly winds that carry fine dust off the You Yangs corridor and deposit it into paint surfaces. Over eleven to twelve years, this combination does specific, predictable damage to an exterior coating – and Scott’s home showed most of it.

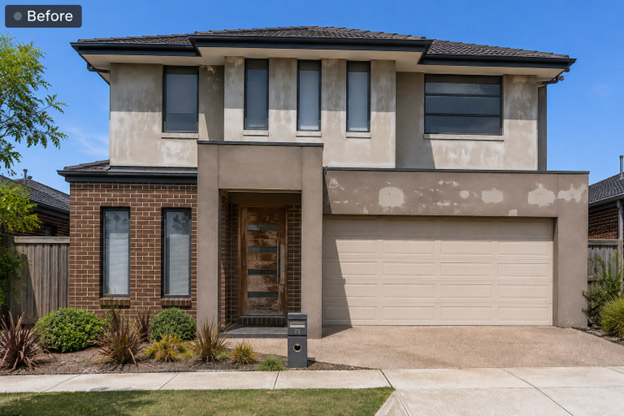
UV chalking on rendered feature walls. The upper-storey rendered sections had chalked significantly - the original colour had faded to a bleached, powdery surface that rubbed off on your hand. This is a specific failure mode of lower-grade acrylic coatings under sustained UV exposure. New paint applied directly over chalking won't bond to the wall - it bonds to the chalk layer, which is already failing. The chalk has to come off first.

Peeling and flaking around the timber entry door. The front door and its surrounding timber frame had received a low-quality oil-based coating at some point - visible from the yellowing and the way it was lifting at the edges. Timber in a west-facing entry position is subject to moisture cycling and direct afternoon sun, which is aggressive on any coating that doesn't flex with the wood.

Uneven previous touch-ups. Several areas on the lower ground floor had been touched up at different points over the years - in slightly different colours, without feathering. Under flat light they were barely visible. Under raking morning light, they stood out clearly. Buyers at inspection notice these things even when they don't consciously register why the exterior looks patchy.

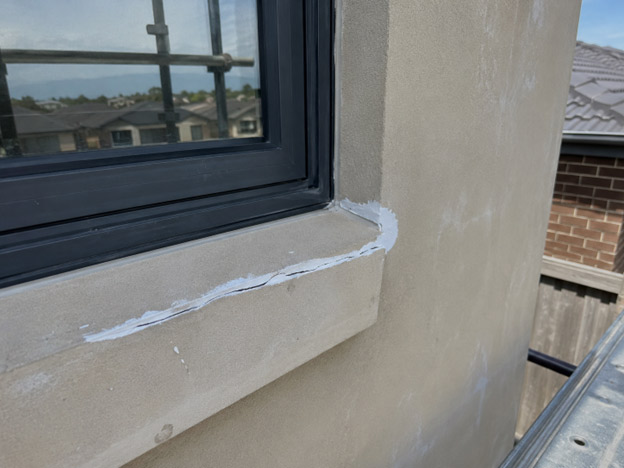
Hairline cracks at control joints and window sills. Brick veneer homes of this era and construction type typically develop minor movement cracks at window sill ends and around control joints in the render. These are rarely structural but they hold moisture and, without treatment, widen and telegraph through any new topcoat within a year or two.

Dust contamination embedded in surface. The paint surface on the lower sections of the west elevation had a gritty, porous texture from years of wind-driven dust. This type of contamination affects both adhesion and the clarity of the final colour if it isn't properly removed before repainting.
We did a full inspection before quoting. On a pre-sale job like this, where the homeowners have a specific campaign date and no appetite for surprises, it matters to understand exactly what you’re dealing with before a dollar figure goes on paper.
We checked:
A proper inspection before an exterior repaint takes 30-45 minutes. The information it surfaces - adhesion condition, moisture, joint failure, coating history - shapes every subsequent decision. Skipping it means you find out what's underneath the surface when you're already on-site with paint mixed and a timeline running.
Seven working days from start to final walkthrough. Here’s what those days covered:
Full site protection. Drop sheets over garden beds, paving, air conditioning units and the driveway. Masking to windows, Colorbond fascia edges and downpipes.
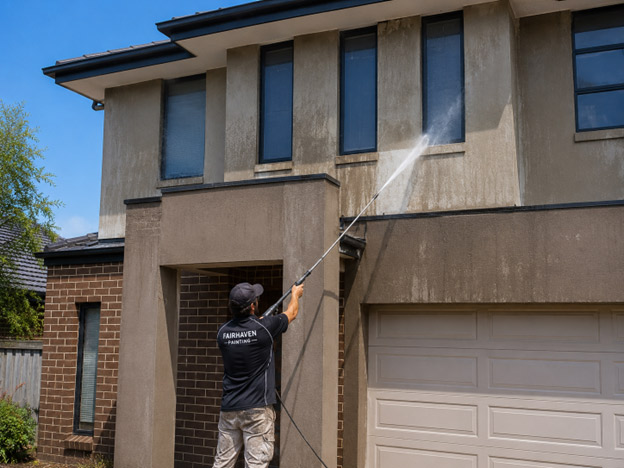
High-pressure wash of entire exterior. All elevations washed to remove dust, chalk, organic growth and surface contamination. Upper rendered sections washed after mechanical preparation, not before, to avoid driving loose material deeper into the surface.
Mechanical preparation of chalking render. Sanding and scraping the upper-storey render to remove the chalking surface layer and provide a clean, sound base. This is slow work on a two-storey elevation with scaffolding – but it’s the step that separates a job that lasts from one that starts failing in year two.
Crack repair and sealant replacement. All hairline cracks filled with flexible exterior filler, sanded flush after curing. Open expansion joints recaulked with a paintable flexible sealant. Window reveals caulked at the brick-to-render junctions to close the gaps that had been admitting moisture.
Timber entry door – full strip back. Existing oil-based coating removed by sanding to bare timber, grain filled, spot primed with an oil-compatible primer, then finished in a water-based semi-gloss. This is a two-day process when done properly – strip on day one, prime and topcoat on day three after the grain filler has cured.
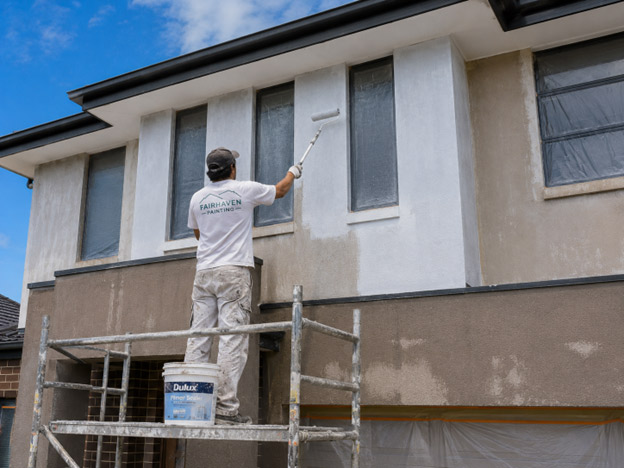
Full prime coat – all prepared and bare surfaces. Dulux Primer Sealer applied to all stripped, sanded and freshly repaired areas. The chalked render sections received a full prime coat, not a spot prime, because the previous coating’s UV degradation had affected the porosity of the surface across a wide area.
Trim and detail work. Window sills, reveals, eave soffits, and garage surrounds finished in semi-gloss to provide a clean contrast to the low-sheen body finish. All lines cut by hand – no spray on this project due to neighbouring properties within close proximity.
Final inspection and client walkthrough. Every elevation checked under raking light before sheets were lifted. Scott walked through with us on the final afternoon and signed off on the result.
Our go-to exterior system for rendered and masonry surfaces in Geelong's climate. UV-stabilised 100% acrylic that resists chalking under sustained sun exposure - directly addressing the failure mode we were dealing with on this property. The low-sheen finish reads well on rendered surfaces and doesn't show minor surface imperfections the way a semi-gloss would.
Applied to sills, reveals, garage surrounds and eave soffits. The contrast between the low-sheen body and semi-gloss trims gives a home a sharper, more finished look - something that reads clearly in buyer inspection photography and in person.
Critical on this job given the extent of the chalking and mechanical preparation on the upper render. The primer seals variable porosity across the prepared surface so the topcoat absorbs consistently - without it, colour can look uneven and the finish film builds unevenly.
Polyurethane-modified, paintable sealant used at all expansion joints, control joints, and window reveals. Movement at these points is constant on a brick veneer home - a rigid sealant fails within a year or two, reopens the joint, and creates the same crack problem again.
Scott’s agent listed the property two weeks after we completed the work. The first inspection week had strong attendance – twelve groups through according to Scott’s follow-up message – and the property sold within that first inspection period.
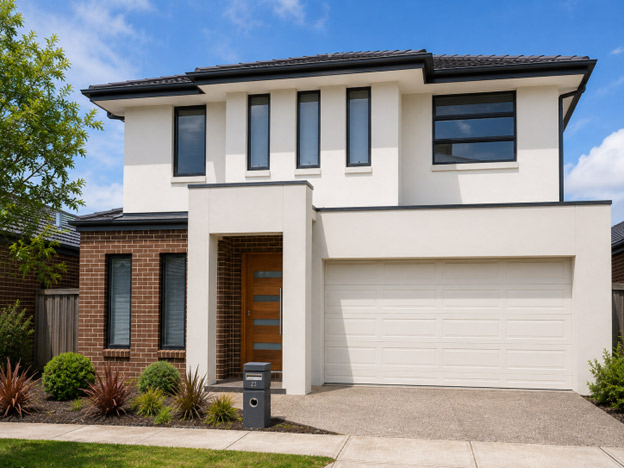
We can’t attribute a sale to a paint job. A lot of variables go into a result like that: market conditions, pricing, the agent’s work, timing. What we can say is that the exterior presentation was no longer a reason for a buyer to hesitate or discount. The chalking render and patchy touch-ups that would have registered as deferred maintenance in buyer photography were gone. What remained was a consistent, well-finished exterior that reflected well on how the property had been maintained.
That’s the realistic case for pre-sale repainting: not that it sells a house, but that it removes the visual signals that cause buyers to reduce their offer or walk away from one.
“We were working to a tight timeline before our campaign launched and Fairhaven delivered. Kaj found cracks and adhesion issues we hadn’t noticed ourselves, showed us what he was dealing with and explained what needed to happen before paint went on. The preparation work took longer than I expected – but when I saw the result, I understood why. Our agent said the property presented better than most new builds in the estate. We sold in the first inspection week.”
Grand Lakes Estate, Lara VIC 3212
Double-storey brick veneer, rendered feature walls
Full exterior repaint - pre-sale
Dulux Weathershield + Dulux Primer Sealer
7 working days
Sold at first inspection week
Lara’s newer estates – Grand Lakes, Lovely Banks, the established sections of the Lara township – have a high concentration of brick veneer homes built between roughly 2005 and 2018. These properties are now at the age where the original exterior coating is reaching end of life on sun-exposed elevations. Render on north and west-facing walls has typically chalked or faded noticeably. Timber entry doors have often been neglected. Control joint sealants have dried and opened.
In a market where buyers are comparing multiple similar properties, these visual signals matter. A chalking render reads as deferred maintenance. A patchy exterior from uneven touch-ups reads as DIY. A home with a consistent, freshly prepared and properly painted exterior reads as a property that’s been looked after – which is exactly the impression a sale campaign needs to create. The cost of an exterior repaint on a property like Scott’s is a small fraction of the gap between a buyer’s opening offer and the asking price.
The second reason preparation matters more than simply painting is durability. A pre-sale repaint done without addressing chalking, cracks and moisture entry will look fine in the listing photography and less fine twelve months after the new owners move in. A properly prepared job protects the buyer as much as the vendor – and a professional painter’s reputation depends on the result looking as good in two years as it does on completion day.
Selling in Lara or Grand Lakes? We’ll inspect your exterior, tell you honestly what needs doing before the photos are taken, and give you a written quote with no obligation.